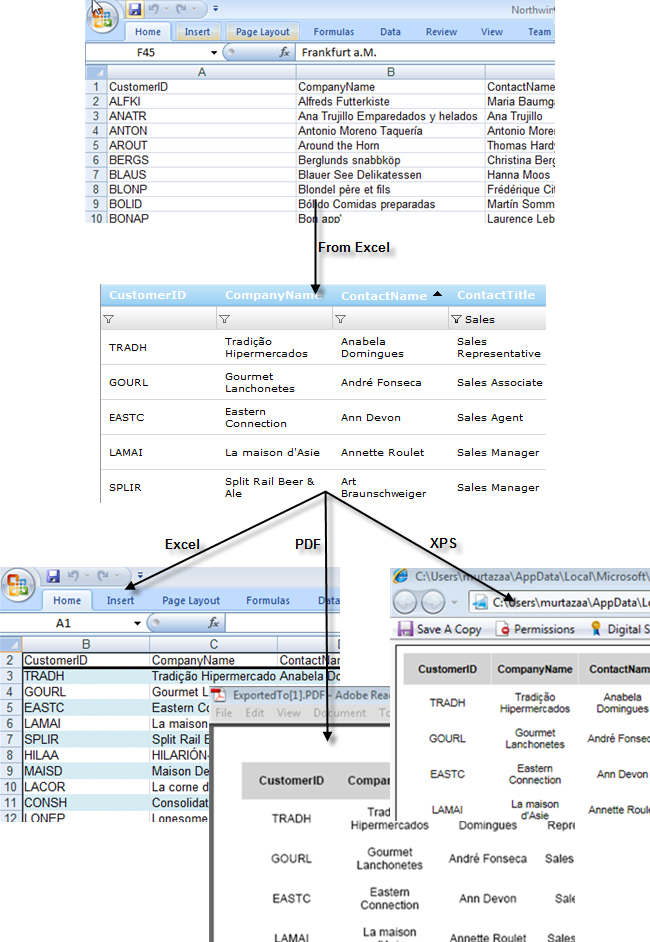
インフラジスティックス コントロールでデータのインポート/エクスポートをする際に使用する Excel や Document API についての多くのご質問が寄せられています。そこで、この記事では、最近リリースされたばかりの WebDataGrid コントロールについてご説明しようと思います。 現在、Excel、PDF、XPS へのコンテンツのエクスポートはビルトインではサポートされていませんが、将来サポートされていく機能の 1 つだと思われます。
さて、Excel API の load メソッドを使用して Excel からデータを取得し、そのデータを WebDataGrid で表示する方法を見てみましょう。
データがグリッドへ接続されると、フィルタリング、並べ替え、編集など、さまざまな機能が使用できるようになります。 ユーザーが表示されているデータをエクスポートしたい場合は、同じ API Engine を使用して編集されたデータをエクスポートし、Excel、 PDF または XPS 形式で表示できます。
データのインポート
はじめにローカル変数を割り当てます。
//Create the temporary table to store data DataTable myDataTable = new DataTable();
DataColumn myDataColumn;
DataRow myDataRow;

//MIN/MAX Values used to frame the working size of the Excel data to be imported.
int minCellRow = Int32.MaxValue;
int maxCellRow = Int32.MinValue;
int minCellColumn = Int32.MaxValue;
int maxCellColumn = Int32.MinValue;
次に NorthWind 顧客データを含む Excel シートを使用して、Excel API の Load メソッドを呼び出してデータを読み込み、データセットを構成します。
Workbook internalWorkBook = Workbook.Load(Request.PhysicalApplicationPath + "Northwind.xls");
Load メソッドは Excel コンテンツを読み込み、Excel ワークブック オブジェクトを返します。
ワークブックが返されたら、データが含まれるワークシートを検索してデータ オブジェクトを構成することができます。このデータ オブジェクトを WebDataGrid へバインドします。
この例では、DataTable を使用します。 まず、データのバインドおよび列の構造を決め、それに従って、データ オブジェクトの骨組みを作成することができます。
ワークブック オブジェクトを使用して行と列を反復し、WebDataGrid へ読み込むワークシートのセルの最大/最小を確定できます。
foreach (Infragistics.Excel.WorksheetRow row in internalWorkBook.Worksheets["Customers"].Rows)
{
    foreach (Infragistics.Excel.WorksheetCell cell in row.Cells)
    {
        if (cell.Value != null)
        {
           //Logic For Determining the Range of Rows/Columns in the Excel File.
           minCellRow = Math.Min(minCellRow, cell.RowIndex);
           maxCellRow = Math.Max(maxCellRow, cell.RowIndex);
           minCellColumn = Math.Min(minCellColumn, cell.ColumnIndex);
           maxCellColumn = Math.Max(maxCellColumn, cell.ColumnIndex);
        }
    }
}
ワークシートの構造情報を集めたら、データベースに行を作成すると同時に WebDataGrid の列を構成できます。
ここでインポートしない列または作成する WebDataGrid の列でプロパティを設定しない列の編集および削除ができます。
for (int i = minCellColumn; i <= maxCellColumn; i++)
{
   //Get the column name
   string columnName = internalWorkBook.Worksheets["Customers"].Rows[minCellRow].Cells[ i].Value.ToString();

   //The export that was demonstrated earlier utilizes the first row
   //for the column header. We can now use that to give column names.
   myDataColumn = new DataColumn(columnName);

   //Add the columns to the datatable.
   myDataTable.Columns.Add(myDataColumn);

   //Create WebDataGrid Columns and enable settings
   BoundDataField bdf = new BoundDataField(true);
   bdf.DataFieldName = columnName;
   bdf.Key = columnName;
   bdf.Header.Text = columnName;
   bdf.Width = Unit.Pixel(100);
   importGrid.Columns.Add(bdf); }
最後にワークシートから DataTable へデータをプッシュします
for (int rowIndex = minCellRow + 1; rowIndex <= maxCellRow; rowIndex++)
{
   //Create a new DataRow myDataRow = myDataTable.NewRow();
   //Loop through the columns and associate the value to each cell
   for (int columnIndex = minCellColumn; columnIndex <= maxCellColumn; columnIndex++)
   {
      myDataRow[columnIndex] = internalWorkBook.Worksheets["Customers"].Rows[rowIndex].Cells[columnIndex].Value;
   }

   //Add The Row to a DataTable
   myDataTable.Rows.Add(myDataRow);
}
DataTable と WebDataGrid 列の準備ができました。次は WebDataGrid へバインドします。
//Set the primary key so that the WebDataGrid can perform Auto Crud
myDataTable.PrimaryKey = new DataColumn[] { myDataTable.Columns["CustomerID"] };

//ImportGrid below is the grid that we have on our page
importGrid.DataSource = myDataTable; importGrid.DataBind();
注 :コードは XLS ファイルがサーバーにあると仮定するため、 Excel Engine へフィードして WebDataGrid へデータをインポートできます。 クライアントでローカルの Excel ファイルをインポートするなどの動作を拡張する場合は、クライアントでファイルを一度サーバーへアップロードする機能を追加する必要があります。 サーバーへアップロードされたら、import メソッドを使用してデータを抽出できます。
データのエクスポート
API を使用してさまざまな形式でのデータ エクスポートのコンセプトは同じです。 まず WebDataGrid 列を反復してエクスポートするドキュメントの列構造を作成します。次にWebDataGrid の行を反復してエクスポートするデータの行を作成します。 どの形式でエクスポートする場合もコードはほとんど同じなため、ここでは Excel へのエクスポートを例として紹介します。
まず、データをエクスポートするワークブックとワークシートのオブジェクトを作成します。更にタスクを達成するためのヘルパー変数を作成します。
//Create workbook and worksheet object for Excel Workbook
theWorkbook = new Workbook();
Worksheet theWorkSheet = theWorkbook.Worksheets.Add("WorkSheet1");
int iRow = 1; int iCell = 1;
次は WebDataGrid 列を反復して Excel シートの列を作成し、その列のセルを埋めるために行を検索します。
//Iterate through the columns of the WebDataGrid and create
 // columns within the worksheet that will be exported.
foreach(GridField gridField in this.WebDataGrid1.Columns)
{
   iRow = 1;
   theWorkSheet.Rows[iRow].Cells[iCell].Value = gridField.Header.Text;
   theWorkSheet.Columns[iCell].Width = 5000;
   iRow += 1;

   //Now iterate through the grid rows to add rows to the worksheet
   foreach(GridRecord gridRecord in this.WebDataGrid1.Rows)
   {
      theWorkSheet.Rows[iRow].Cells[iCell].Value = gridRecord.Items[iCell-1].Text;
      iRow += 1;
   }
   iCell += 1;
}
添付のサンプルには、エクスポートでセルを書式化するための追加コードが含まれます
ワークシートを作成してデータをエクスポートしたら、Excel シートをストリームへ書き込んでクライアントで表示できます。
//Create the Stream class
System.IO.MemoryStream theStream = new System.IO.MemoryStream();

//Write the in memory Workbook object to the Stream
theWorkbook.Save(theStream);

//Create a Byte Array to contain the stream and send the exported sheet to the client
byte[] byteArr = (byte[])Array.CreateInstance(typeof(byte), theStream.Length);
theStream.Position = 0;
theStream.Read(byteArr, 0, (int)theStream.Length);
theStream.Close();
Response.Clear();
Response.AddHeader("content-disposition", "attachment; filename=ExportedTo.xls");
Response.BinaryWrite(byteArr);
Response.End();
完成です!
上記コード サンプルに弊社製品に含まれる API を使用して、Excel からのデータ インポート、更にデータを Excel, PDF または XPS へのエクスポートが可能になります。