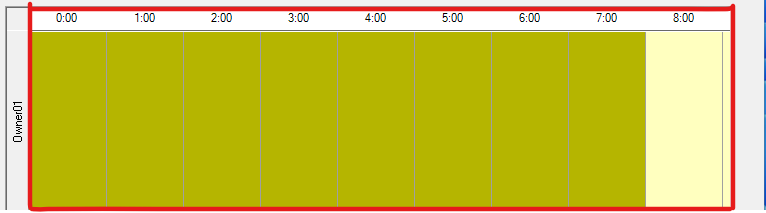
UltraTimeLineView で、 owner の領域を含まないタイムライン領域(下図の赤枠)に出力するタイムスロットの数を調整する方法をご紹介します。
1タイムスロットあたりの幅(columnWidth)を設定できます。
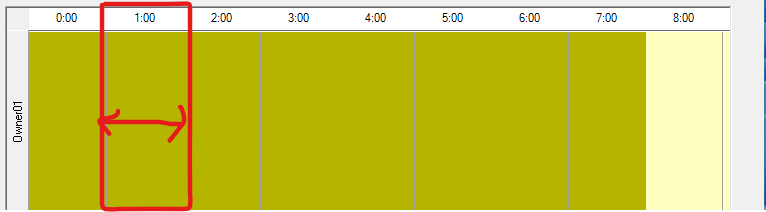
UltraTimeLineView には 1タイムスロットあたりの幅(下図の赤枠)を設定するプロパティ(columnWidth)が存在しており、これをうまく利用すればよさそうですね。
タイムライン領域の幅を取得し、出力したいタイムスロット数で割ってあげると、1タイムスロット当たりの幅が算出できますので、 columnWidth に設定すればいいですね。
タイムライン領域の幅を取得する(プロパティがないので UIElement から取得しています)
残念ながら、UltraTimeLineView にはタイムライン領域の幅を取得するプロパティがないため、今回は UltraTimeLineView の ColumnHeaderAreaUIElement の Rect 幅を取得して試しました。(Paint イベントで実装)
以下のコードはボタンクリックで、タイムラインに表示するタイムスロット数を6スロットに変更するサンプルです。
public partial class Form1 : Form
    {
        // タイムライン表示領域の幅()
        int timeLineWidth = -1;
        // 出力するタイムスロット数
        int timeSlotCount = 10;

        public Form1()
        {
            InitializeComponent();

            // タイムスロット 1スロットあたりの時間間隔を設定する。
            TimeInterval timeInterval = new TimeInterval(60, TimeIntervalUnits.Minutes);
            this.ultraTimelineView1.PrimaryInterval = timeInterval;

            // 以下は Ownerの設定
            this.ultraCalendarInfo1.Owners.UnassignedOwner.Visible = false;
            this.ultraCalendarInfo1.Owners.Add("Owner01");
            this.ultraCalendarInfo1.Owners.Add("Owner02");
            this.ultraTimelineView1.CalendarInfo = this.ultraCalendarInfo1;
        }

        private void ultraTimelineView1_Paint(object sender, PaintEventArgs e)
        {
            if (timeLineWidth < 0)
            {
                // タイムライン表示領域の幅を取得する。
                UIElement columnHeaderElement = ultraTimelineView1.UIElement.GetDescendant(typeof(ColumnHeaderAreaUIElement));
                timeLineWidth = columnHeaderElement.Rect.Width;
            }
        }

        private void button1_Click(object sender, EventArgs e)
        {
            timeSlotCount = 6;

            // ColumneWidth にタイムライン表示領域幅を表示したいタイムスロット数で割った数値を設定する
            ultraTimelineView1.ColumnWidth = timeLineWidth / timeSlotCount; 👈 ここで1タイムスロットの幅を設定しています。
        }
    }
是非お試しください。